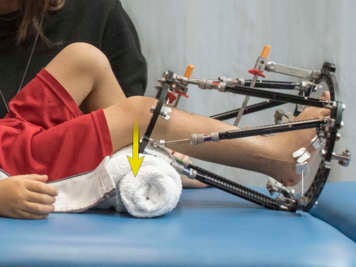
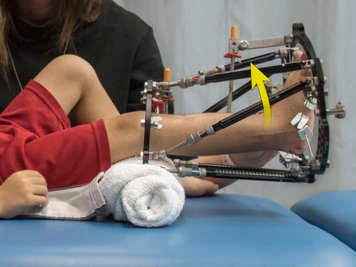
Following surgery, your child will experience some edema (swelling) and stiffness. Regular exercises will help your child minimize swelling and maintain range of motion and muscle strength.
Managing edema
It is important to keep the leg elevated above the heart when resting and to perform regular ankle pumps and circles.
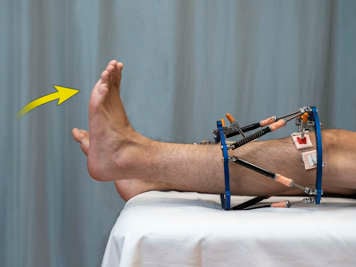
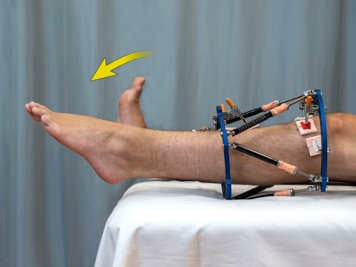
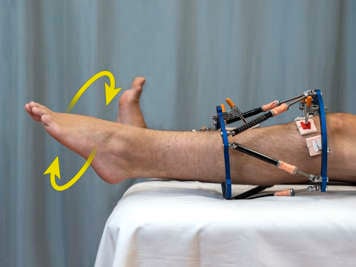
Ankle pump and circles
Starting position: Sitting on a bed or a chair with leg extended straight
- Move the ankle to bring the toes and foot towards the face.
- Move the foot back down like it is pushing on a gas pedal.
- Move the ankle in circles in both directions. It might help to imagine drawing a circle with the big toe.
Do _____ pumps and circles (each direction) every hour or if your child is sitting for a long time.
Range of motion exercises
Range of motion exercises help maintain movement in your child’s joints throughout your child’s leg lengthening process. It is very important to do them to prevent joint stiffness and any related complications.
Notes about the exercises
- Not all the exercises shown here may be necessary for your child. If your child’s foot is bound to their frame, ankle exercises will not apply to them. Your child’s physiotherapist will explain which exercises your child should do and how to modify them if needed.
- Some exercises require you to handle your child’s leg to further a stretch or support the weight of their frame. Depending on the location of your child’s frame and pin sites, your handling may vary a little from the descriptions below. Your child’s physiotherapist will assist you with this.
- As a general rule, try to place your hands as close as possible to the joint you are stretching to avoid added stress through the bone.
- Your child should do the recommended exercises three times a day or as often as instructed by the physiotherapist.
Ankle dorsiflexion (DF) while sitting
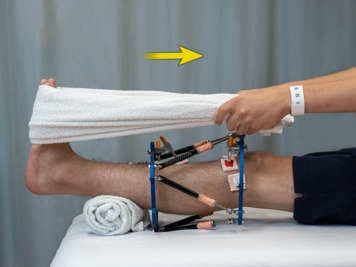
Starting position: Sitting on a bed with leg extended straight
Warm-up: Move the ankle up and down slowly 10 times to warm up the muscles and make the stretch more comfortable
- Wrap a towel or thick band around the middle of the foot and hold one end in each hand.
- Keeping the knee as straight as possible, have your child slowly pull their foot towards their face using their own muscles.
- Use the towel to bring the foot further into a stretch. Your child should feel this in the back of their calf.
- Hold for ______ seconds.
Do exercise _____ times. Repeat _____ times a day.
Ankle DF while sitting (assisted)
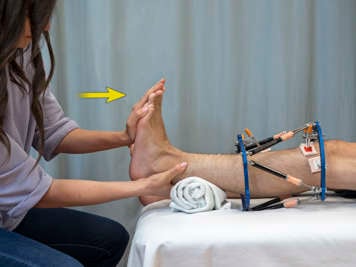
Starting position: Sitting on a bed with leg extended straight
- Have your child bring their toes and ankle towards their face as much as they can on their own, without raising their leg off the bed.
- You (the parent or caregiver) can gently further the stretch, making sure the leg remains straight. Your child should feel this in the back of their calf.
- Hold for ______ seconds.
Do exercise _____ times. Repeat _____ times a day.
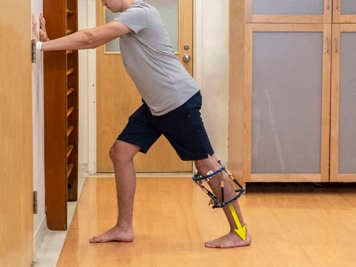
Ankle DF standing (runner's lunge)
Starting position: Standing facing a wall with feet and knees pointed straight ahead
- Have your child step back with the leg they are stretching.
- Keeping hips level and the upper body straight, have them lean forward with their hands out to touch the wall. The front knee may be bent, but the back knee should remain straight.
- Your child should stay in this position until they feel a stretch at the back of the calf on their back leg. Both heels should stay on the floor throughout the exercise.
- Hold for _____ seconds.
Do exercise _____ times. Repeat _____ times a day.
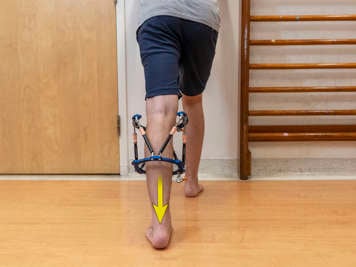
Ankle plantar flexion
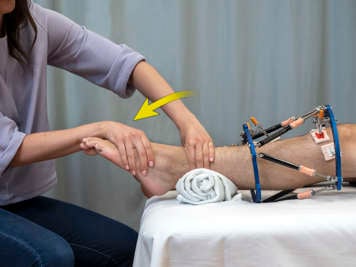
Starting position: Sitting or lying down
- Slowly move the toes downwards like the foot is pushing on a gas pedal. Your child should feel the stretch on the front of the ankle.
- If they do not feel the stretch, you can help by bringing the ankle further into the movement. You should put one hand over the top of the foot and another hand just above the ankle if the frame allows.
- Hold for ____ seconds.
Do exercise ____ times. Repeat _____ times a day.
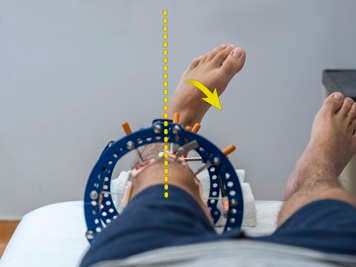
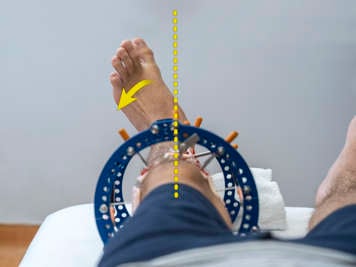
Ankle inversion and eversion
Starting position: Sitting or lying down
- For inversion, bring the big toe in towards the midline.
- For eversion, move the baby toe away from the midline.
- Make sure only the foot and ankle are moving. Keep the rest of the leg still. It might help to imagine that the foot is moving like a windshield wiper.
Do ____ inversions and eversions. Repeat _____ times a day.
*Note: If your child’s ankle gets tight, you may be asked to help them stretch it further towards or away from the midline. Your therapist will help with this.
Toe flexor stretch
Starting position: Sitting or lying down
Warm-up: Wiggle the toes up and down approximately 10 times to warm up the muscles
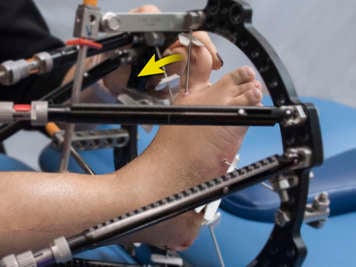
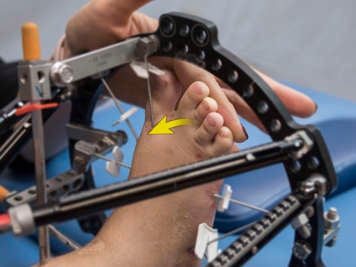
- Holding your child’s big toe (as shown below), gently bring it towards the face until a stretch is felt along the bottom of the foot.
- Hold for ____ seconds.
- Repeat steps 1 to 2 with the remaining toes together.
Do exercise _______ times. Repeat ____ times a day.
*Note: Sometimes the wires near the toe will block full extension, so just move it as far into extension as the frame allows.
Knee flexion and extension (active assisted)
Starting position: Lying down on a bed or other smooth surface (to allow the heel to slide)
Warm-up: Slowly bend and straighten the knee 10 times as much as possible in each direction
- For flexion, bend the knee and slowly slide the heel up towards the bum, as far as it can go. If the heel cannot touch the bed because of the frame, you can support your child’s leg and help them move it to make sure that they have a full range of motion.
- When your child feels a stretch over the front of their thigh, hold the position for five seconds.
- For extension, slowly move the heel back down the bed until the leg is straight again.
Do exercise ____ times. Repeat ____ times a day.
*Note: Some children may require the adult assisting them to perform most of the movement. This will be determined by your child’s physiotherapist.
Knee flexion (assisted)
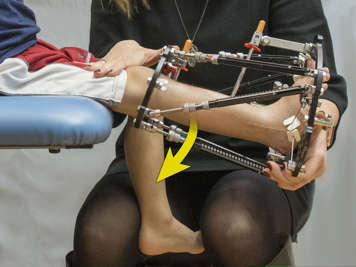
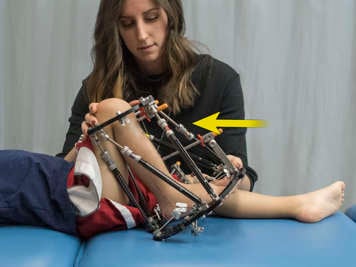
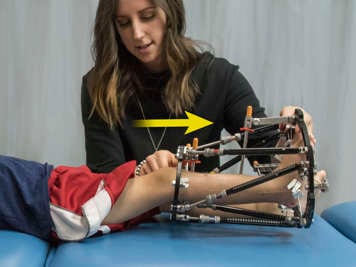
Starting position: Sitting at the edge of a chair or bed so the frame is off the surface
- Straighten the knee. You should help by holding your child’s lower leg to support the weight of the frame.
- Slowly bend the knee. You should let your child bend their knee by themselves. Use one hand to support the frame as it lowers and use the other hand to support the knee.
- Keep bending the knee until your child feels a stretch in the font of their thigh or until the frame stops them from bending any further. You may need to have your child move forward on the bed to allow more room for the knee to bend.
- Hold for ___ seconds.
Do exercise ___ times, making sure the leg straightens each time. Repeat ___ times a day.
Prone lying
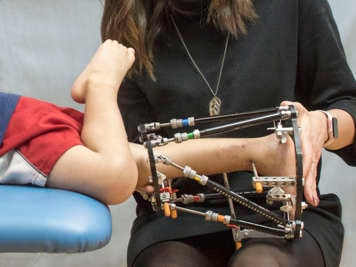
Starting position: Lying on the stomach on a bed, with knees and lower leg off the edge of the bed
- Have your child lie like this for 15-20 minutes, making sure that the front of the hips stay flat on the bed. This keeps the pelvis level.
- If the frame is too heavy, you can support your child’s lower leg, or place a stool under it, making sure the knee can stay completely straight. The stool should be lower than the bed to ensure there is no bend in the knee.
- Perform this stretch once daily.
Assisted knee extension
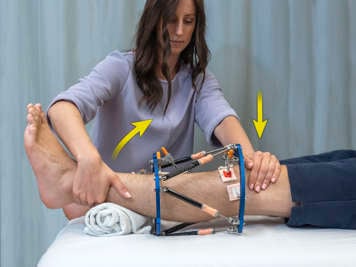
Starting position: Sitting
- Place one hand above your child’s knee and one hand around their lower leg, as close as possible to the knee to support the joint. Depending on the frame, you may use your full forearm to support the lower leg.
- Gently press downwards above the knee and upwards against the lower leg. This is to extend (straighten) the knee.
- Hold for ____ seconds.
Do exercise ___ times. Repeat ____ times a day.
*Note: Due to the shape of the frame, you will likely need to place a small roll under your child’s ankle/frame to allow for full extension of the knee during the stretch.
Knee extension stretch (standing)

Starting position: Standing with the leg extended straight on a stair or on the floor, depending on flexibility
- Have your child stand with their heel on the floor, or a block, and their toes against a wall.
- Keeping the knee as straight as possible, have them lean slightly forward. Your child should feel a stretch through the back of their thigh and knee.
- Hold for ____ seconds.
Do exercise ___ times. Repeat ____ times a day.
*Note: Depending on how flexible your child’s hamstrings are, they may not be able to bend as far forward as shown. Your child’s physiotherapist will assist you with this.
Strengthening exercises
Strengthening exercises help maintain the strength of your child’s muscles throughout the leg lengthening process. It is important to do them to maintain your child’s mobility.
Isometric quadriceps (static contractions)
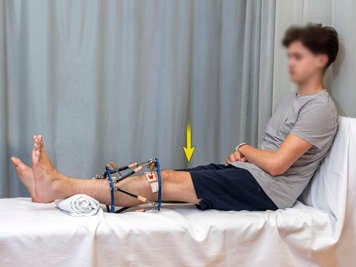
Starting position: Sitting up with back supported and a small roll under the heel
- Have your child tighten their thigh muscles and push their kneecap down into the bed. They should make the knee as straight as they can. Make sure the kneecap and toes point straight up towards the ceiling throughout the exercise.
- You will likely need to place a small roll under the ankle to allow the knee to fully straighten.
- Hold for 3-5 seconds.
- Relax.
Do exercise ____ times. Repeat ____ times a day.
*Note: If the frame prevents your child from fully straightening the knee on the bed, your child’s physiotherapist will show you how to modify the exercise.
Quadriceps setting over roll
Starting position: Lying down or sitting up with back supported on a bed, knee slightly bent over a rolled-up towel
- Have your child tighten their thigh muscles and push their knee down into the roll.
- Lift the lower leg and foot up off the bed. Keep the knee on the roll and make sure the kneecap and toes point straight up towards the ceiling throughout the exercise.
- Try to hold the leg up for 3-5 seconds.
- Slowly lower the leg back down.
Do exercise _____ times. Repeat ____ times a day.
