At the end of this chapter, you will be able to:
- Learn how to apply an oximeter probe correctly on your child
- Understand the routine maintenance of oximeters
- Understand what to do in the event of an alarm
How does an oxygen saturation probe work?
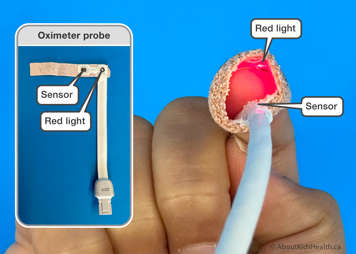
An oxygen saturation probe, oximeter probe or “sat probe” is a light and sensor with a band-aid like sticker that is attached to your child’s toe, foot or finger to measure your child’s oxygen saturation and heart rate levels.
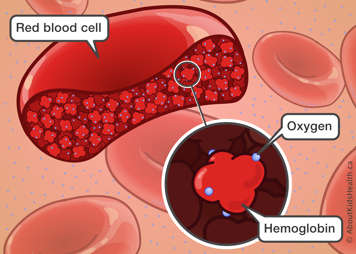
Hemoglobin in your red blood cells carries oxygen throughout the body. The oximeter measures the percentage of oxygen molecules attached to that hemoglobin.
When you place the probe on your child, a red light measures the oxygen on the hemoglobin and gives you a percentage. This is why it is important to make sure the light and sensor are aligned to ensure an accurate reading. The best place for the oximetry probe will depend on the age and size of your child.
Attention
Always keep the oximeter probe on your child when they are sleeping or unwell.
For how long at a time does my child’s oxygen saturation need to be monitored?
Your child’s oxygen saturation levels should be monitored continuously at night. Some children might also need continuous monitoring during the day, while others might only need “spot checks”. Before your child leaves the hospital, your health-care team will review when and how you should use the oximeter for your child as well as how to manage alarms.
Oxygen saturation probe
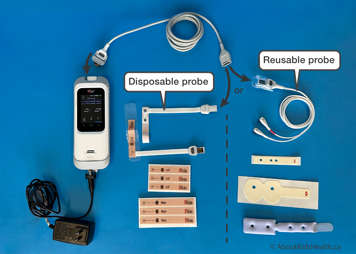
There are disposable and reusable type probes. The disposable probe wires are used for a few weeks with the sticker replaced every 1 to 2 days as needed.
The Ontario VEP program has information on how to attach the probe to your child’s toe, foot or finger.
How do I connect the oxygen saturation probe to my child?
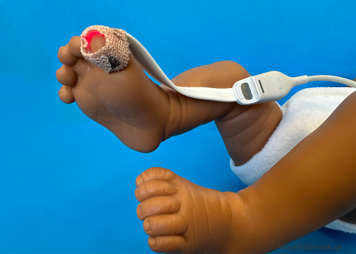
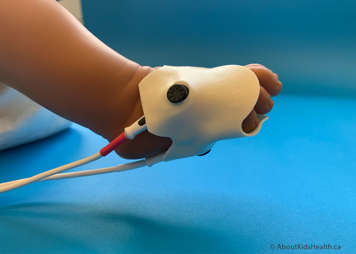
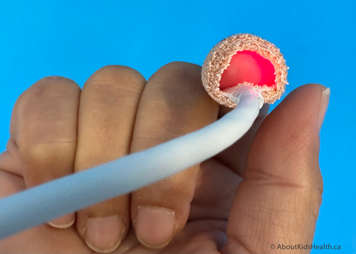
- Connect the probe to the Masimo oximeter device.
- Press the power button to turn on the machine.
- Check the alarm settings for oxygen saturation (SpO2) and heart rate.
- Attach the probe to your child’s finger, toe, heel of the foot or palm of hand. Make sure the red light is on.
- Check that all the indicators on the front panel light up and that you hear a beep.
- Monitor your child. Check their readings for oxygen saturation (SpO2) and heart rate.
- When monitoring is complete, remove the probe from your child.
- Dispose of the adhesive only if it is disposable and not sticky. If it is still in good condition, store it for next use. Check the manufacturer's instructions.
- Turn off the oximeter.
Once the probe is attached to your child then attach the probe to the cable as shown above. Some probes may have an additional clip that will help secure the probe to the cable.
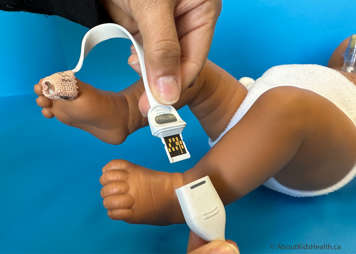
Reusable Y-sensor probe with foam wrap
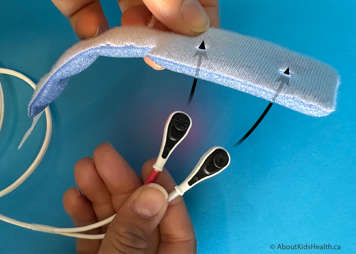
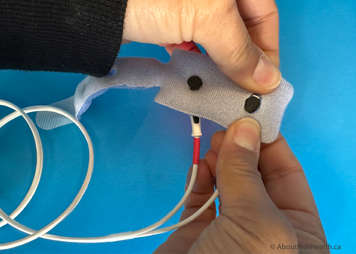
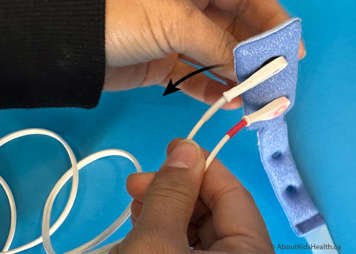
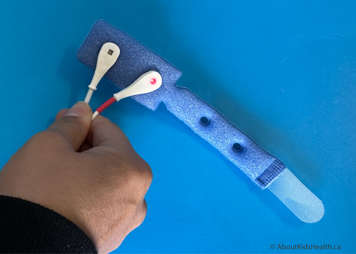

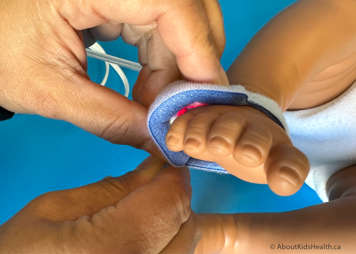
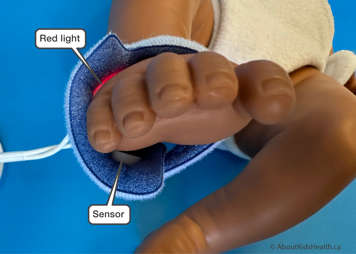
If you are using the non-disposable probe options, you can use Velcro or stickers to attach it to the child. There are foot wraps stickers for around a baby’s foot or straight stickers to apply to a finger or toe.
How often do I need to change the location of the probe?
The probe should be moved to a different finger or toe every four hours. This will help ensure that it is working properly. It also gives your child's finger or toe a break.
|
My child’s normal oxygen saturation levels are:____________________ My child’s normal heart rate levels are:____________________ |
What do I do if my child has an oxygen saturation reading below their target range?
If the oxygen saturation (SpO2) reading is low, observe your child.
If your child looks healthy, has a normal skin tone and is not having trouble breathing
- Assess your child’s breathing and colour. If they are comfortable and stable, proceed to step 2. If they are not stable, respond to your child (see below).
- Assess your child while they are not moving to ensure the SpO2 goes back to the normal reading. Also, ensure your child does not have any nail polish or artificial nails as this can affect the reading.
- Assess the probe. Ensure the red light is lit, ensure the sensor is not blocked by adhesive build up. Try using an alcohol swab to clean the probe.
- Change the probe site.
- Change to a new probe.
- Try the probe on yourself.
- Change the cable.
- Call the VEP.
If your child is having trouble breathing
Assess your child’s airway
- Suction any blockages in your child’s airway or tracheostomy as needed.
- Change the tracheostomy tube if it is still blocked after suctioning.
Assess your child’s breathing
- If your child is making good breathing efforts on their own or with the ventilator, give them oxygen through the tracheostomy mask or the ventilator.
- If your child is not making good breathing efforts on their own or with the ventilator, manually ventilate your child with oxygen and check for chest rise.
Assess your child’s circulation
- Check your child’s heart rate and skin tone and use the oximeter to check their perfusion.
- Call 911 or go to the nearest hospital emergency department if low oxygen saturation readings continue.
Cleaning and reuse of Masimo Sensor Probes
Reusable sensors can be cleaned per the following procedure:
- Remove the sensor from the patient.
- Disconnect the sensor from the monitor.
-

Wipe the entire sensor clean with a 70% isopropyl alcohol pad.
- Allow the sensor to air dry before returning it to operation.
How to change the sticker on the probe:
The probe wire lasts about 1 to 3 weeks on average. The sticker will need to be replaced every 1 to 2 days.
-

To change the sticker, peel off the old sticker from probe as shown.
-

Peel off a new sticker from the stickers provided.
-

Place a new sticker onto the probe as shown.
Do not place the sticker on the side of the probe that has the sensor and light.
How should I clean and maintain the oximeter?
- When the probe wire gets dirty, clean it gently with a damp cloth or an alcohol swab. Clean the sensor and light area as well so they are not obstructed, for example with sticker tape, body oils etc. Replace the disposable probe when it is no longer reading properly or if the probe is worn out where any wiring is exposed.
- When the outer surface of the oximeter gets dirty, disconnect it from AC power and clean it with a soft cloth dampened with a solution of warm water and a mild detergent. Do not allow liquids into the inside of the oximeter.
- Wipe the surface of the oximeter with one of the following solvents:
- a soft cloth dampened with a mild detergent and warm water solution
- Cidex Plus (3.4% glutaraldehyde)
- 10% bleach solution
- 70% isopropyl alcohol solution
- To clean the display panel, wipe it gently with a cotton swab moistened with one of the above cleaning solvents.
- Do not use petroleum-based solutions, acetone solutions or other harsh solvents to clean the oximeter.
Role of the Ventilator Equipment Pool (VEP)
Where do I get an oximeter and the related equipment?
You can borrow the oximeter and receive all the related supplies (probes, cables and wrap) and 24-hour equipment troubleshooting support through the Ventilator Equipment Pool (VEP) without cost. This is funded by the Ontario Ministry of Health’s Assistive Devices Program (ADP), to which you need to apply.
Your health-care team will guide you through the application process and help you learn about the oximeter.
How do I know when and how to return the oximeter?
Your child’s health-care provider will tell you when you can return the oximeter. Once you get confirmation, call the VEP (the number is on the oximeter) for information on how to return it.
Please note that technical issues with the oximeter should be routed to the VEP also.
Helpful tips when using an oximeter
- Always keep the battery fully charged.
- When the probe gets dirty, clean it gently with a damp cloth or alcohol swab.
- When connecting your probe, always insert the plug correctly. Check the plug carefully to avoid damage.
- When disconnecting and connecting the probe, grip the plug, not the cable.
- When not in use, place the probe in a safe place where it cannot be damaged.
- You must place the probe properly to get the correct oxygen saturation level.
- Change the position of the probe at least every 4 hours.
