
At the end of this chapter, you will be able to:
- demonstrate how to perform a routine two-person tracheostomy tube change
- demonstrate how to change tracheostomy ties
- change a tracheostomy tube with a cuff
- change a tracheostomy tube with an inner cannula
- change a tracheostomy tube if your child is dependent on a ventilator
- change the inner cannula for three-part tracheostomy tubes (inner cannula, outer cannula, obturator)
- change tracheostomy ties and dressings
How often should a tracheostomy tube be changed?
If there is no inner cannula, your child’s tracheostomy tube is changed as per the guidance from your child’s health-care team. Children’s tracheostomy tubes are most often changed every one to two weeks to prevent the tube from plugging.
If there is an inner cannula, your child's tracheostomy tube is changed every month or on the advice of your child’s health-care team. The inner cannula should be changed at least twice daily.
You may also need to change the tracheostomy tube more often when your child is unwell and when you are first learning to do tracheostomy tube changes with health-care educators.
Your child’s health-care team will tell you exactly how often your child will need to have their tube changed.
How long does it take to change a tracheostomy tube?
Once you are familiar with the process, a routine tracheostomy tube change will take about 20 to 30 minutes from start to finish.
How do I change my child's tracheostomy tube?
Routine tracheostomy tube changes should be performed by two people: the main person and an assistant. In an emergency, one person may change the tracheostomy tube.
In this section you will learn:
- which supplies to gather before you start
- how to perform a two-person tracheostomy change
- how to change a a tracheostomy tube with a cuff
- how to change a tracheostomy tube with an inner cannula
- how to change the inner cannula for three-part tracheostomy tubes
- how to change tracheostomy ties and dressings
Precaution
To reduce the risk of choking, coughing or breathing difficulties, change your child's tracheostomy tube before feeding or at least one hour after feeding .
Before you start
- Identify and assign the main person and assistant roles.
- Gather your supplies:
- your child’s emergency tracheostomy kit
- cleaning supplies
- suction device and supplies
- oximeter
- all required additional equipment
Reminder: Your child may require two different sizes of suction catheters and feeding tubes for the manual suction setup based on the sizes of the main tube and one-size down tube. Please ensure all sizes are available in your emergency tracheostomy kit.
Emergency tracheostomy kit supplies
- same size tracheostomy tube with obturator and ties in place
- tracheostomy tube next size smaller with obturator and ties in place
- precut gauze
- manual suction setup (syringe with feeding tube)
- gauze for cleaning
- water soluble lubricant
- scissors
- saline nebules/ampules

Cleaning supplies
- gauze pads (for cleaning, drying) or saline-soaked medical grade cotton swabs (single use)
- cup to soak the swabs in saline
- saline nebules
- clean pre-cut gauze for under tracheostomy flange, if advised by your child’s doctor
- wet facecloth
- dry facecloth

Additional equipment and supplies
- wound care supplies, if prescribed
- suction machine, suction catheters/adjuncts and tubing
- sterile water
- container for soiled supplies
- good light source
- manual resuscitation bag with tracheostomy adaptor and the appropriately sized face mask
- stoma mask, if prescribed
- oximeter with probe
- oxygen, if prescribed

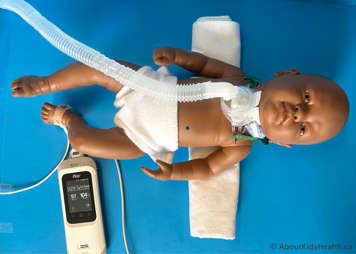
Performing a two-person tracheostomy tube change
A two-person tracheostomy tube change is recommended for a routine tracheostomy tube change.
The person in the main role performs the tube change while the second person assists. The main person may also be referred to as the "clean person" since they are responsible for holding the clean tube and the tube change, and it is their responsibility to keep everything clean. The assistant may be referred to as the "dirty person" since they help with suctioning and cleaning.
To learn how to perform an emergency one-person tracheostomy change, please see the next page Changing the tracheostomy tube: One-person tracheostomy tube change.
-
Make sure your baby or child is calm and settled. For older children, explain what you are about to do.
-

Wash your hands.
-

Make sure the oximeter probe is on your child and oxygen saturations are at their baseline. The probe may be placed on an older child's toe or finger or around a baby's foot.
-

Inspect the clean tracheostomy tube to make sure that it is not bent and that there are no cracks or discolorations. If it is bent, cracked or discolored, throw away this tracheostomy tube and use a new tracheostomy tube. Check that the new tracheostomy tube is the correct size and also verify that it is not past the expiry date on the packaging. Ensure the tracheostomy ties are attached.
-

Check that the obturator goes into and out of the outer cannula smoothly and keeps the shaft of the tracheostomy tube centered.
-
If the obturator feels a bit tight, you can lubricate the inside of the cannula with normal saline or use a small amount of water-based lubricant to thinly lubricate the obturator for smooth insertion and removal. If the obturator requires force to push in and/or pull out, then you must replace the whole tracheostomy tube.
-

Prepare the tracheostomy tube (outer cannula) for insertion by putting a small, thin amount of water-soluble lubricant on the outside of the tube. In an emergency, you may not have time for this step.
-

Lay the tracheostomy tube down on a piece of gauze or a sterile towel with shaft pointing upwards. This will keep the tube clean before insertion.
-
Lay your child on their back. Put a roll or blanket under their shoulders to tilt the head back and extend the neck. Older children may prefer to sit up, but make sure their head and back are supported, if needed.
-
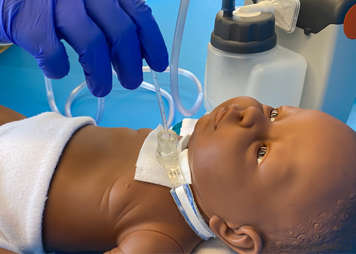
Remove any humidity and/or oxygen. Suction the tracheostomy tube so your child's airway is clear before you insert the new tube. If your child requires oxygen (and/or ventilation), reapply until you are ready to change the tracheostomy tube.
-
Divide the remaining tasks between the main person and assistant. Remember: Communication is key.


Main person: Hold the tracheostomy tube in place.
Assistant: Gently remove any gauze. Clean and dry the skin around the stoma. Leave the ties secured when doing stoma care. You can loosen the ties a bit but ensure you stabilize the tube. If needed, pull the ties apart to clean around the neck.

Main person: The main person should continue to support the child and keep them still.
Assistant: Clean the stoma before performing the tracheostomy tube change.


Main person: Hold the tracheostomy tube in place.
Assistant: Unsecure the ties from either the back Velcro (shown above) or one of the side Velcros and bring the tie around the neck to the other side. You can leave the ties on one side to do the trach change.
Alternate method to remove ties


Main person: Hold the tracheostomy tube in place
Assistant: If your child has ties that can be undone at the back of the neck, you can undo the Velcro and bring both sides of the ties around on each side.


Main person: Gently remove the child's old tracheostomy tube using a downward motion that follows the curve of the tracheostomy tube. Do not pull straight out. Place the dirty tracheostomy tube in a designated area for dirty supplies.
Assistant: Support the child and keep them still.

Main person: Keep the child calm.
Assistant: Wipe the stoma and surrounding area so you can better see the stoma, if needed.
Main person: Pick up the clean outer cannula, holding the face plate between two fingers. With the other hand, make sure the obturator is inside.
Assistant: Support the child and keep them still.
One-handed method


Main person: Take the prepared new tracheostomy tube with the obturator and gently guide it into the stoma using a curved motion that follows the curve of the tracheostomy tube. Make sure to hold the obturator secure while inserting. The tube should go in easily without discomfort. It is normal for the child to cough. Do not put pressure on it once it is in the trachea. This image shows how to insert the tube using one hand.
Assistant: Support the child and keep them calm and still.
Two-handed method


Main person: Take the prepared new tracheostomy tube with the obturator and gently guide it into the stoma using a curved motion that follows the curve of the tracheostomy tube. Make sure to hold the obturator secure while inserting. The tube should go in easily without discomfort. It is normal for the child to cough. Do not put pressure on it once it is in the trachea. This image shows how to insert the tube using two hands. You may use either a one- or two-handed method, depending on your preference.
Assistant: Support the child and keep them calm and still.


Main person: Holding the clean tracheostomy tube, immediately take out the obturator. If the child uses a tracheostomy tube with an inner cannula, put it in now and secure the tube.
If you cannot insert the tracheostomy tube, try using one that is a size smaller. If that does not work, follow the emergency care step.
Assistant: Continue to hold the tracheostomy tube still while the main person removes the obturator from the tracheostomy tube. Support the child and keep them still.
Do not discard the obturator. It will be cleaned and reused, so keep it in a safe place where you can easily find it.


Main person: Hold the tracheostomy tube in place. Check that your child is breathing normally by putting your finger close to the tube to check that you feel their breath coming out. Also check to see if they are breathing comfortably (observe chest rise). Check your child’s oxygen saturation.
Assistant: Secure the ties at the back and on each side of the flanges. Leave a one-finger gap between the ties and skin.
Alternate method for resecuring ties


Main person: Hold the tracheostomy tube in place. Check that your child is breathing normally by putting your finger close to the tube to check that you feel their breath coming out. Also, check to see if they are breathing comfortably (observe chest rise). Check your child’s oxygen saturation.
Assistant: Secure the ties at the back and on each side of the flanges. Leave a one-finger gap between the ties and skin.

Main person: Support the child.
Assistant: Ensure there is a one-finger gap between the ties and the skin.

Main person: Suction the new tracheostomy tube, if needed.
Main person: If your child is on oxygen or has an HME and tracheostomy mask, put it back on.

Clean, dry and prepare the used tracheostomy tube for the tracheostomy kit right away
Changing a tracheostomy tube with a cuff
Follow the steps below to change a tracheostomy tube with a cuff.
-
Explain to your child what you are going to do. For babies, make sure they are calm and settled. Ensure that your child has not eaten for at least one hour before the tube change.
-
Wash your hands and put on gloves.
-

Make sure the oximeter probe is on your child and oxygen saturations are at their baseline. The probe may be placed on an older child's toe or finger or around a baby's foot.
-
Inspect the clean tracheostomy tube:
-

Ensure it is not bent and there are no cracks or discolorations. If it is bent, cracked or discolored, throw this tracheostomy tube out and use a new tracheostomy tube.
- Check the tracheostomy tube is the correct size.
-
Check the cuff integrity on the new tracheostomy tube prior to changing it.

Measure the amount of water you will use to check the cuff inflation with.
Slowly inflate the cuff to 5 mL (neonatal and pediatric tubes) and ensure the balloon fills evenly. If your child has an adult sized Bivona cuffed tube, the cuff volume to check cuff integrity is 10 mL.
Deflate the cuff and remove all the water again before insertion.
-
-
Check that the obturator slides in and out of the clean tube smoothly. If the obturator feels a bit tight, you can lubricate the inside of the cannula with normal saline or use a small amount of water-based lubricant to thinly lubricate the obturator for smooth insertion and removal. If the obturator requires force to push in and/or pull out, then you must replace the whole tracheostomy tube.
-
Attach the tracheostomy ties.
-

Prepare the tracheostomy tube (outer cannula) for insertion by putting a small, thin amount of water-soluble lubricant on the outside of the tube including the deflated cuff. In an emergency, you may not have time for this step.
-

Lay the tracheostomy tube down on a clean surface with the shaft of the tube pointing upwards. This will keep the tube clean before insertion. Ensure the cuff is deflated.
-
Lay your child on their back. Put a roll or blanket under the child’s shoulders to tilt the head back and extend the neck. Older children may prefer to sit up, but make sure that their head and back are supported, if needed.
-

Suction the tracheostomy tube so your child's airway is clear before you insert the new tube.
-
Divide the remaining tasks between the main person and helper. Communication is important.
-

Before taking out the old tracheostomy tube, deflate the cuff.
-
Suction again.
-


Remove the tracheostomy ties and then pull out the tracheostomy tube.
-

Detach the ventilator tubing (or other adjunct that is on the tube). Have the ventilator tubing ready to attach once the new tracheostomy tube is in place.
-

Wipe the stoma if visibly soiled or secretions are blocking stoma view.
-


Reinsert the new tracheostomy tube.
-


Secure the new tube by the flanges and take out the obturator and secure ties.
-


If your child is on a ventilator, attach the ventilator adaptor before securing the ties. Reinflate the cuff to the prescribed amount of air of water.
-

Replace the gauze, if your child uses it.
-
Reassess the child.


How do I change the inner cannula for a three-part tracheostomy tube?
For children using a three-part tracheostomy tube (inner cannula, outer cannula and obturator), the inner cannula is changed at least once a day (or more as needed or prescribed).
Before you start
Gather your supplies:
- sterile inner cannula (disposable or reusable)
- clean basin or bowl
- emergency tracheostomy kit
- suction machine, suction catheters/adjuncts and tubing
- oximeter and working probe
- oxygen, if needed
- manual resuscitation bag
Some of the items in your kit may need to be replaced after you use them. Remember to keep the kit stocked with fresh nebules, suction catheters, gauze, sterile water and other one-time-use items.
If you are using a reusable inner cannula, wash it according to the tracheostomy equipment cleaning instructions. If you are using a disposable inner cannula, throw it away after each use and replace it with a new disposable inner cannula for the next tube change.
Changing the inner cannula

- Wash your hands.
- Make sure the oximeter is on your child and oxygen saturations are at their baseline.
- Suction your child to remove secretions, if needed. Monitor oxygen saturation.
- Remove the new inner cannula from its packaging or storage container according to the manufacturer’s instructions.
- Hold the neck plate securely with one hand. Using the other hand, gently remove the used inner cannula using a curved downward motion. Ensure you are not placing too much counter pressure on the flange while unlocking and relocking the inner cannula.
- If the used cannula is disposable, discard it. If it is reusable, place it to one side for cleaning.
- Suction to remove secretions, if needed. If your child is able to clear the secretions with coughing, suctioning may not be needed.
- Hold the neck plate securely with one hand. Using the other hand, gently insert the new inner cannula using a curved upward motion. Lock in place or squeeze the sides to secure.
- Clean the area.
- Wash your hands.

Hold the neck flange of the tracheostomy tube when changing the inner cannula. To release the inner cannula and lock a new one into place, squeeze the outer edges.
How do I change the tracheostomy ties
Keeping the tracheostomy ties clean and dry will prevent skin irritation, sores and infections in the skin around the neck. It is highly recommended that ties are checked daily and changed as needed. Do not exceed one week between changing the ties.
There should always be two people present when changing the ties. One person will hold the tracheostomy tube in place while the other person cleans the skin and changes the ties. If a second person is not around to help, attach the clean ties first and then remove the old ties.
Before you start
- Identify and assign the main person and assistant roles.
- Gather your supplies:
- clean tracheostomy ties
- tweezers
- tracheostomy gauze, if needed
- scissors
- suction machine, suction catheters/adjuncts and suction tubing
- your child’s emergency tracheostomy kit
- oximeter
- oxygen, if applicable
- manual resuscitation bag
Changing Velcro tracheostomy ties
-
Make sure your child is in a comfortable position.
-
Wash your hands.
-

Make sure the oximeter is on your child and oxygen saturations are at their baseline.
-

Have the assistant hold the tracheostomy tube in place by gently holding onto the flange.
-


Remove the old Velcro tie from one side.
-

Insert and secure the new Velcro strap into the same neck plate hole.
-


Adjust the ties to fit your child’s neck and secure the other side.
-

You should be able to fit one finger between the tie and your child’s neck. Your finger should be able to go all the way around the neck. For older (adult sized) children, this should be 2 finger widths.
-
Wash your hands.


