At the end of this chapter, you will be able to:
- demonstrate how to perform a routine one-person tracheostomy tube change
In an emergency or if no one is available to assist, you may need to change a tracheostomy tube on your own. To change a tracheostomy tube with only one person, repeat the steps above except you will need to perform both the main person and assistant duties on your own.
Reminder: A one person tracheostomy change should only be completed in an emergency situation. A regular tracheostomy change should be completed with two people.
Before you start
Gather your supplies:
- your child’s emergency tracheostomy kit
- cleaning supplies
- all required additional equipment
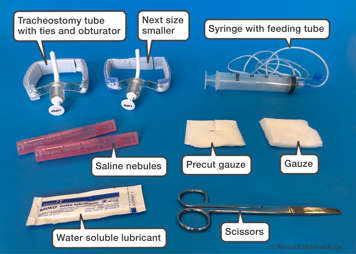
Emergency tracheostomy kit supplies
- same size tracheostomy tube with obturator and ties in place
- tracheostomy tube, one size smaller than your child's current tube, with obturator and ties in place
- precut gauze
- manual suction setup (syringe with feeding tube)
- gauze, for cleaning
- water soluble lubricant
- scissors
- saline nebules/ampules

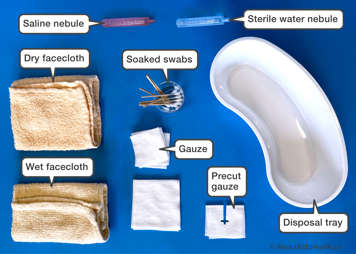
Cleaning supplies
- gauze pads (for cleaning, drying) or saline-soaked medical grade cotton swabs (single use)
- cup to soak the swabs in saline
- saline nebules
- clean pre-cut gauze for under tracheostomy flange, if advised by your child’s health-care provider
- wet facecloth
- dry facecloth

Additional equipment and supplies
- wound care supplies, if prescribed
- suction machine, suction catheters/adjuncts and tubing
- sterile water
- container for soiled supplies
- good light source
- manual resuscitation bag with tracheostomy adaptor and the appropriately sized face mask
- stoma mask, if prescribed
- oximeter with probe
- oxygen, if prescribed
Performing a one-person tracheostomy tube change
A one-person tracheostomy tube change should only be performed in an emergency.
Make sure your baby or child is calm and settled. For older children, explain what you are about to do.
Wash your hands, if there is time. As this procedure is done in emergencies, you may use hand sanitizer to clean your hands more quickly.
Make sure the oximeter probe is on your child and oxygen saturations are at their baseline, if there is time to do this. The probe may be placed on an older child's toe or finger or around a baby's foot.
Quickly inspect the clean tracheostomy tube to make sure that the tracheostomy tube is intact. If it is bent, cracked or discolored, throw away this tracheostomy tube and use a new tracheostomy tube. Check that the new tracheostomy tube is the correct size.
-

Gently remove any gauze.
-

Remove one side of the tracheostomy ties.
-

Bring the ties around to the other side. Alternatively, if the ties have a Velcro tie at the back, you can loosen that instead.
-


Hold the hub and remove the old tracheostomy tube in the motion shown by the arrows in the picture.
-

Remove the old tracheostomy tube.
-

Two-handed method with thumb on the obturator. 
One-handed method holding the obturator. Obtain the new, clean tracheostomy tube and insert it gently in a curved motion as shown by the arrow in the picture. This is the two-handed method with one thumb holding down the obturator.
Alternatively, you can use a one-handed method of insertion. Ensure you are holding the obturator during insertion. -


While securing the tracheostomy tube by the flange, pull out the obturator and place in your dirty container or on a towel.
-


Bring the tracheostomy ties around and secure to the other side of the flange.
Suction the new tracheostomy tube, if needed.
If your child is on oxygen or has an HME and tracheostomy mask, put it back on.
- Clean, dry and prepare the used tracheostomy tube for the tracheostomy kit right away.