At the end of this chapter, you will be able to:
- discuss the purpose of a speaking valve
- discuss different types of speaking valves
- demonstrate how to safely use a speaking valve on your child
- describe how to clean and maintain the speaking valve
Airway and voice without a tracheostomy
There are three main parts of voice production:
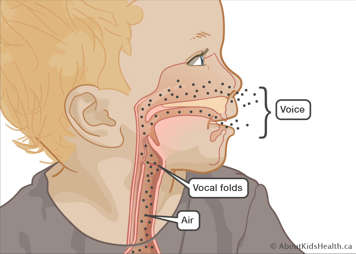
- a “power source” (air)
- a “vibrator” or main sound source (the larynx)
- “resonators” (the throat, nose, mouth and sinuses)
As air moves from our lungs it passes through the larynx and between the vocal folds. The vocal folds are open during inhalation and exhalation and closed during a breath hold.
When we speak, the vocal folds vibrate open/closed quickly which produces sound (or, in this case, “voice”).
Air needs to pass through the vocal cords and up through the nose and mouth to make a voice.
Changes to the airway with a tracheostomy
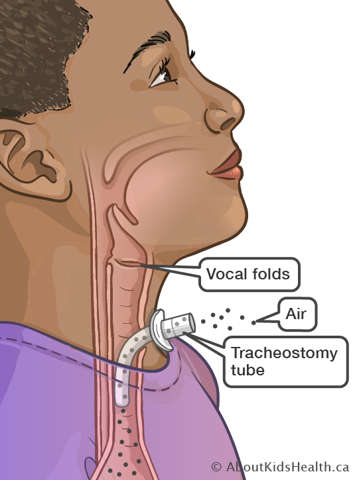
After tracheostomy tube insertion, your child will breathe through the tracheostomy tube. Very little air flows through the vocal folds, mouth and nose. This means that less air can pass through the vocal folds and so less sound is produced.
Although some air can leak around the tracheostomy tube to the upper airway through the vocal folds, it may not be strong enough to create speech sounds. A speaking valve is used to push all the exhaled air to the upper airway to help create improved speech.
Speech with a tracheostomy tube
Several factors may influence the ability to create voice/vocalize (the amount of air that goes up and around the vocal folds). These may include:
- the degree of upper airway obstruction
- whether the vocal cords are working properly
- the size of the tracheostomy tube that your child has in place and if there is a cuff around it
Everyone is different, and some children may not be able to produce sound, at least not at first. The speech and language pathologist (SLP) can work with your child, family and caregivers to help develop the best method of communication for your child. Even if your child is not able to produce sound, intervention with a SLP is still very important to maximize communication and development.
One-way speaking valve with a tracheostomy tube
What is a one-way speaking valve?
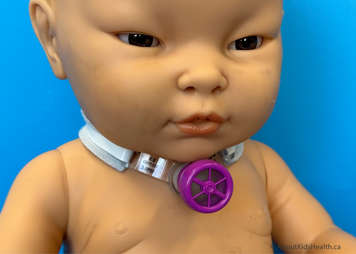
A speaking valve is a one‐way valve connector that is placed on the end of your child’s tracheostomy tube to allow for speech. The valve allows the child to breathe in through the tracheostomy tube but does not allow air to escape out the tracheostomy tube on exhalation.
Airflow is redirected upwards through the vocal folds, mouth and nose therefore enabling voice and improved communication. The valve opens during inhalation (i.e., breathing in). When inhalation is done, the valve closes and all the air is breathed out through the vocal folds, mouth and nose. The air cannot escape back out the tracheostomy tube during exhalation (i.e., breathing out).
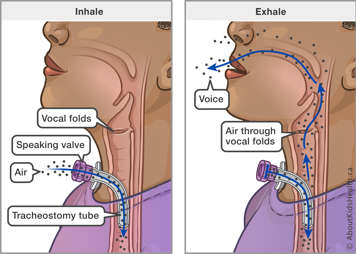
EXHALE (breathing out through mouth and nose)
What are the benefits of wearing a speaking valve?
- Helps your child vocalize (e.g., cry, coo and babble) which is an important precursor to speech and important to the parent/child bonding process.
- Improves speech and tone.
- Improves secretion management.
- Improves swallowing.
- Improves smell and taste.
- Increases cough strength to clear secretions.
- Helps to keep the lungs inflated.
- Helps to wean from the ventilator and/or tracheostomy tube (if applicable).
- Improves quality of life.
- Improves overall development.
Wearing a speaking valve will not:
- necessarily mean that your child will “speak” (see factors that affect voice above)
- prevent infection
Who can use a speaking valve?
Not all children with tracheostomies will benefit from a speaking valve. An assessment will be done in the clinic. Some hospitals have specialized clinics that help to determine if it is safe for your child to use a speaking valve.
In general children with tracheostomy tubes that use a speaking valve:
- are awake, responsive and attempting to communicate
- are medically stable including: medications, routines, ventilator settings and adjunctive treatments
- are able to tolerate having the cuff deflated (if applicable)
- do not have more than usual amount of secretions (this can block the speaking valve)
- have a safe swallow and are not at a significant aspiration risk (may require a swallow study to confirm)
- are able to move air around the tracheostomy tube and into the upper airway
Ventilator use with a one-way speaking valve
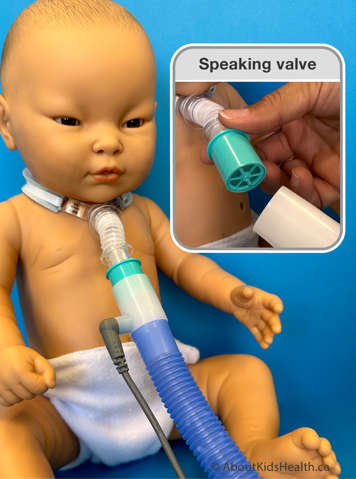
- The speaking valve can be used in‐line with the ventilator.
- Generally, it should be placed as close to the tracheostomy as possible. Your child’s health-care team will review the set up with you. Ventilator settings may need to be changed while the speaking valve is in use. This will be assessed in clinic by your health-care team.
When to use the speaking valve
The health-care team will work with you to put together a recommended schedule of when to use the speaking valve. It is helpful to track changes in the length of time the speaking valve is worn (wear time). The wear time will gradually increase. With increased comfort and familiarity, and approval from your health-care team, the speaking valve may be worn when eating and/or drinking.
When NOT to use the speaking valve
- Do not use the speaking valve if your child is asleep – they must be awake to use the speaking valve.
- Do not use the speaking valve if your child is sick.
- If oxygen saturations are decreased, secretions are increased, and/or your child may be breathing faster than usual.
- Do not use a speaking valve while your child is using a medication compressor for nebulized medications.
- Do not use the speaking valve if it feels uncomfortable – not every day is the same; if it doesn’t feel right that day then don’t use it.
How do I use a speaking valve?
The following equipment and supplies should be readily available when using a speaking valve:
- a speaking valve (as prescribed by your child’s health-care team)
- suction machine and supplies
- emergency tracheostomy kit
- manual resuscitation bag with a mask
- ventilator, ventilator circuit and connectors (if applicable)
- oxygen saturation monitor and probes
- oxygen and oxygen interface (if applicable)
- Gather your equipment and supplies as listed above.
- If the tracheostomy tube has a cuff, make sure it is completely deflated.
- Suction the tracheostomy tube to make sure it is clear of secretions (if using a cuffed tube, suction before and after you deflate the cuff).
- While holding the flange of the tracheostomy tube with one hand, place the speaking valve on the tracheostomy tube with a gentle twist in a clockwise direction. (To remove the valve, twist it in the opposite direction.)
- If your child is also using a ventilator, your health-care team will instruct you on the proper placement of the valve in-line with the ventilator circuit. Your health-care team might recommend changing some of the ventilator settings while your child is using the speaking valve.
- Once the speaking valve is in place, watch your child for signs of distress and lower oxygen saturation levels.
- If your child uses a cuffed tracheostomy tube, remember to re-inflate the cuff after you remove the speaking valve.
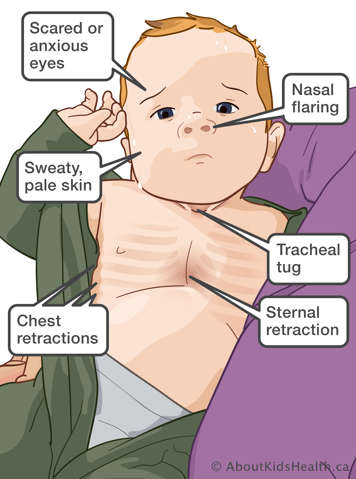
Remove the speaking valve if you see any signs of distress:
- increased respiratory rate (faster breathing)
- flared nostrils
- skin pulling around neck or ribs
- pale skin
- frightened look
- bluish nail beds
- blue around the mouth
Precautions
- Awake: Never use the speaking valve when your child is asleep.
- Use when well: Never use the speaking valve when your child is sick or has increased secretions.
- Deflate: If using a cuffed tracheostomy tube, make sure the cuff is deflated before placing the speaking valve.
- Suction: Always suction before placing the speaking valve onto the tracheostomy tube.
- Speaking valve: Place the speaking valve onto the tracheostomy tube using a gentle clockwise motion.
- Monitor: Your child should never be left alone, especially when first using the speaking valve. Monitor them and their oxygen saturation the whole time.
Secretion management and suctioning
Always suction the tracheostomy tube before using the speaking valve. Occasional suctioning may be required while wearing the speaking valve. Do not be discouraged – the speaking valve promotes improved secretion clearance and management. The need for suctioning is often reduced when the valve is on.
Swallowing
A speaking valve should make it easier to swallow. Watch for any signs of aspiration or the need for suctioning. Speak to your health-care team if you have any questions.
Why is it important to check that the speaking valve is working properly?
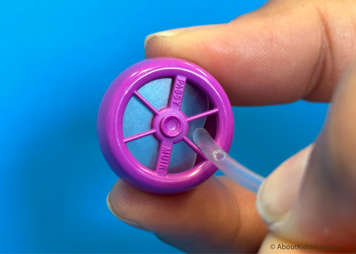
The flap on the speaking valve can become stuck due to secretions or dried soap. Checking the flap on the speaking valve ensures that your child will be able to breathe in while using it. To check the speaking valve, you can use a clean cotton-tipped swab or the end of a clean suction catheter and gently push on the valve to ensure it is not sticking. Also check:
- there is no tear in the valve
- there are no cracks on the side of the valve
- you do not hear vibrations
- there is no increased resistance when your child breathes in
How often should I clean the speaking valve?
Clean the speaking valve daily even if your child has only used it for a short time.
How do I clean the speaking valve?
- Wash hands
- Remove the speaking valve by carefully holding the tracheostomy tube with one hand while pulling the speaking valve from the tracheostomy tube in a gentle twisting motion.
- If the lid of the speaking valve is designed to open for cleaning, open it.
- If there is an oxygen port present, do not place excess pressure on the port when opening the cap lid. If there is an oxygen port, use a tracheostomy brush or medical grade pipe cleaner to clean inside the port.
- Place the speaking valve and accessories in a solution of pure, unscented liquid soap and warm water.
- For Shiley speaking valves, you may soak the opened valve in the cleaning solution for 10 minutes. Then agitate the valve in the cleaning solution.
- For Passy Muir and Tracoe brand speaking valves, swish the valve in the water for about 10 seconds.
- For Montgomery and Shikani speaking valves, please refer to manufacturer’s guidelines or speak to your child’s health-care provider for cleaning instructions.
- Rinse the speaking valve thoroughly with warm water.
- Examine the valve for remaining debris or encrustations. Ensure that the flexible diaphragm is clean, not torn or sticky and that it lies flat in the valve cap.
- Check inside the valve to make sure it is smooth and undamaged. Once examined close the lid firmly until it snaps into place, if there is one.
- Allow the speaking valve to air dry completely before storing in a closed container away from dust and moisture.
Precautions
- Never clean the speaking valve with hot water, peroxide bleach, vinegar, alcohol, brushes or cotton swabs.
- Do not autoclave.
- Do not use a blow dryer to heat or dry.
- Do not place the speaking valve in the storage container to dry.
Troubleshooting and frequently asked questions:
What do I do if it is harder for my child to breathe when using the speaking valve?
Remove the valve immediately. Then:
- check that the tracheostomy cuff is completely deflated (if relevant)
- make sure your child is in a comfortable upright position
- check the position of the tracheostomy tube
- suction your child's airway and mouth to clear secretions
- try distracting your child to decrease anxiety
If you have tried all of the above and your child is still having difficulty breathing, contact your health-care team.
What if the speaking valve pops off because of coughing?
Remember that initial placement of the speaking valve may cause coughing as the flow of air and secretions moving through the upper airway may feel different. Coughing will continue until secretions have settled or moved to a position that will allow you to remove them. Coughing usually improves with increased use of the speaking valve. If the speaking valve pops off continually without coughing, stop using the valve and contact your health-care provider that prescribed the valve.
What do I do if the speaking valve is making a noise?
Clean the speaking valve. If the noise persists after cleaning, replace the speaking valve.
What if my child is using the speaking valve but still cannot speak or produce vocalizations?
It will take some time for your child to get used to the feeling of air passing up through the upper airway. You can try distracting your child, for example with fun games, activities, videos or music. Also, any sound is good sound, so praise your child anytime they use their voice, whether they produce a sound, a laugh or even a cry.
Can a tracheostomy mask with humidity be used while wearing a speaking valve?
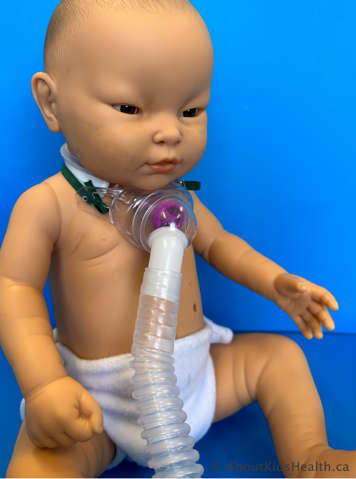
Yes, as long as medications are not being nebulized. Remove the speaking valve when giving aerosolized medications. If the valve is left on in error, remove it and rinse it well prior to using.
Can oxygen be given with the speaking valve in place?

Yes, oxygen can be given with the speaking valve in place. Most brands of speaking valves come with ones you can add oxygen to directly or there are other ways to add oxygen. Your child’s health-care team will show you how to do this and prescribe the amount of oxygen to use.
When should the speaking valve be replaced?
The speaking valve should be replaced approximately every 6 months or sooner. The speaking valve needs to be replaced if it continues to stick together despite cleaning.
Funding and purchasing a speaking valve:
- Your health-care provider will complete an Ontario Assistive Devices Program (ADP) form and select speaking valve in order for you to receive a quarterly grant. It can take up to 3 months for you to receive your first grant cheque.
- From ADP your child will receive $420 per year broken down into quarterly grant payments of $105 to help with purchasing a speaking valve.
- Examples of additional government funding should you require it:
- Assistance for Children with Severe Disabilities (ACSD)
- Ontario Works Program (OWP)
- Ontario Disability Support Benefits (ODSB)
- If your family qualifies for additional government funding, you will receive $560 per year ($140 every 3 months as quarterly grant cheques) towards the purchase of speaking valves for your child.
Where do I buy a speaking valve?
- A speaking valve can be purchased from any medical supply vendor.
- A speaking valve costs approximately $150.00 although prices vary amongst vendors.
Common tracheostomy speaking valve brands:
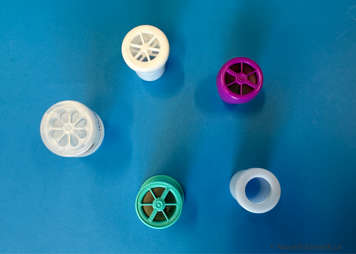
- Shiley
- Tracoe
- Montgomery
- Passy-Muir
- Shikani
Speaking valve accessories
