
At the end of this chapter, you will be able to:
- discuss equipment needed to suction
- demonstrate how to use a suction machine
- demonstrate how to use manual suction
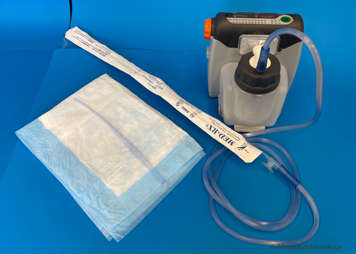
Suction machines
No matter what type of suctioning you perform, you will need to use a suction machine.
There are portable suction machines (that use batteries) and stationary suction machines (that plug into an electrical outlet).
You should have at least two suction machines before your child goes home from the hospital in case one machine breaks down. At least one of your suction machines should be portable so that you can "suction on the go" when outside your home.
Many brands of suction machines are available. Your local medical vendor will help you decide which one is best for your child. The vendor will also teach you how to use the suction machine you decide to buy.

For information about your specific brand of suction machine, please refer to online resources available from vendors and companies.
All suction machines have a:
- filter
- canister
- pressure gauge or pressure level indicator that indicates the set pressure way to adjust the pressures
- AC plug and/or a battery and charger
- a power switch
Note: Some suction machine models offer a car charger option. Keep this with you when travelling.
Filter
Filters on your child’s suction machine are routinely changed every 1 to 2 months depending on the manufacturer’s recommendations.
The filter may need to be replaced sooner if it is wet or soiled. A wet or dirty filter can greatly affect suction pressure and make the machine work harder and less optimally. It is recommended to have an extra filter in the suction machine bag, especially when on the go.
Shut off valve
Some suction machines will have automatic shut off valves that prevent the canister from overflowing. This is a good feature to consider when purchasing a suction machine. There are different types of shut off valves and options for internal or external filters. Discuss this option with the vendor you will be obtaining the suction machines from.
In this model, the lid of the canister features a float shut-off ball.
Setting up the suction machine
Follow the instructions provided for your child’s specific suction machine to setup.
- Connect the suction tubing to the canister.
-

Turn on and cover up the end of the suction tubing with your thumb. Adjust the pressure regulator dial (orange knob in this picture). Check the suction pressure by turning on the unit and covering the end of the tubing with your clean or gloved finger. Look at the number on the gauge, and make sure it is the number set by your health-care professional. Release your finger from the suction tubing and recheck the pressure. Readjust if needed.
Pressure setting for infants: 80-100 mmHg.
Pressure setting for children: 100-120 mmHg. -
Attach the correct suction catheter or Yankauer to the tubing. Ensure you have the appropriately sized catheters for both sizes of tracheostomy tubes in the emergency tracheostomy kit.
- Proceed with suctioning.


How to adjust the pressure on your child’s suction machine

There are different models of suction machines, and each may vary in the way suction pressures are selected. Some have LED gauges while others have a knob that you rotate to adjust the pressure.
Before suctioning your child, check to make sure the suction pressures are set correctly.
- Block the suction tubing with a gloved thumb. See picture in step 2 above.
- Adjust the pressure regulator knob until the prescribed suction pressure is reached.
- Verify the pressure reading on the pressure gauge or LED pressure level indicator (depending on the suction machine type you have).
- If the setting is not correct, readjust the regulator knob until you have the desired setting.
My child's suction setting: __________ mmHg
Internal battery
Most portable suction machines feature a rechargeable seal internal lead acid battery. These batteries become depleted over time. Expect to replace the battery after approximately one year or sooner, depending on how much it is used daily.
Funding for suction machine
The Assistive Devices Program (ADP) in Ontario covers 75% of the cost of one suction machine, every three years (please see ADP website for more information. The second suction machine is not covered by ADP and is an out-of-pocket expense. Your private insurance may cover these additional costs or if you/your child qualifies for certain government funding programs (e.g., Ontario Works, Assistance for Children with Severe Disabilities, Ontario Disability Support Program), you qualify to receive additional funding.
You should budget for battery replacement, since suction machine repair costs are not covered by ADP. The warranty for the internal battery is only 6 months for most manufacturers. The warranty for the unit is about 1–2 years depending on the manufacturer. ADP will fund a new unit every 3 years if the current machine is no longer working. Your vendor will help you send the broken machine for repair. If the unit is not repairable, and it has been 3 years since you purchased it, you can qualify for a new unit. Ensure you keep your original receipts.
Important:
- Keep suction unit plugged into an AC wall outlet overnight and when possible, throughout the day so that it will be ready to use when you need it next.
- The battery on a fully charged suction machine usually lasts for approximately 45-60 minutes of continuous use, but this will vary from machine to machine. Aim to use the battery for only 30 minutes at a time so that it can re-charge more quickly in between suctions.
- A fully discharged battery will require several hours (depending on depth of discharge) of charging to reach full capacity.
- If the unit is not in use for extended periods, the battery should be recharged a minimum of every 6 months.
- Completely discharging the battery will shorten the battery life. Do not operate the unit for more than a few minutes if the low battery indicator light is lit. Recharge the battery as soon as possible.
Manual suction
A manual suction setup should be kept in the emergency tracheostomy kit for backup if your suction machine fails. Your child’s health-care team will assist you with setting up manual suction of the correct size for your child's emergency kit. The manual suction setup usually consists of a syringe and a feeding tube that is the same size as the suction catheter that your child uses.
Practice using the manual suction before you go home so that you are familiar with how it works and how much you have to pull back on the syringe.

How do I manually suction?
-

Place the tubing to the length of the tracheostomy tube that you would normally suction your child to. Keep in mind that the feeding tube being modified for this purpose is more flexible, so you have to guide it more.
-

Once the tubing is in at the level you need it to be, pull back on the syringe. This will create suction and pull back secretions into the syringe.
-

Take the manual suction tube out of your child’s tracheostomy and provide a break before you go in and suction again, just like you would with normal suctioning.
- Detach the syringe from the manual suction feeding tube and empty contents of the syringe into a garbage receptacle or dirty container. Ensure secretions do not spray anywhere else. Reattach the tube and suction again if needed.
- Inform your child’s health-care provider if you have had to use the manual suction setup. They can also help you get another setup. If you do not have a backup set, then do not discard the one you’ve used in case of an emergency.
- Contact your respiratory vendor to get them to replace the suction machine.


Other types of manual suction setups

The Res-Q-Vac is a type of store-bought manual suction device. It’s a handheld device that creates suction pressure when pressed several times. Suction catheters for these types of units are typically unit specific.