At the end of this chapter, you will be able to:
- identify types and parts of your child’s tracheostomy tube
- describe how a tracheostomy tube functions
A tracheostomy tube is inserted into the trachea through the stoma in the neck to help your child breathe.
The tube itself is curved and hollow and can be made of polyvinyl chloride (PVC), polyurethane, silicone, or a combination. Although less common, tracheostomy tubes can also be made of stainless steel or silver.
Tracheostomy tubes are manufactured by different companies. Some common names are Shiley, Bivona, Portex or Tracoe. Your child’s ear nose and throat (ENT) surgeon will decide which tracheostomy tube is placed.
Parts of a tracheostomy tube
Tracheostomy tubes can have two or three parts. Two-part tracheostomy tubes are most used in younger children while three-part tracheostomy tubes are used in older children.
Two-part tracheostomy tube
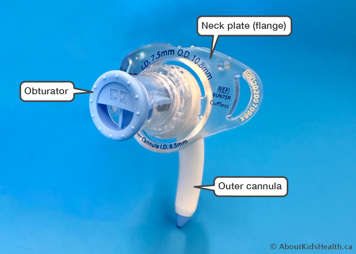
A two-part tracheostomy tube consists of an:
- outer cannula with a neck plate (flange)
- obturator
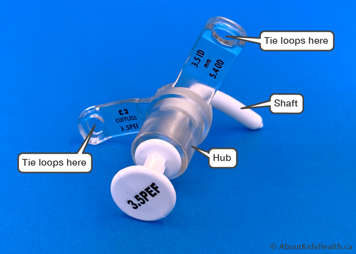
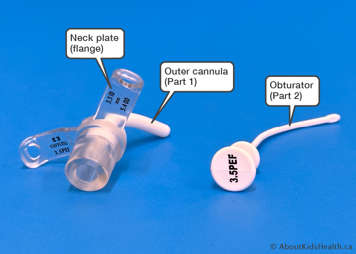
Outer cannula
The outer cannula holds the tracheostomy open. The neck plate (flange) is part of the outer cannula.
Neck plate (flange)
The flange is the flat part of the tube that lies against your child’s neck. It holds the tracheostomy tube to the neck. The tracheostomy ties get looped into the holes on either side of the flange.
Flanges come in a variety of designs as well. Your child may have a V-neck or straight neck design. The initial tracheostomy and flange type is chosen by the ENT surgeon. Often one flange is chosen over the other for fit and comfort.
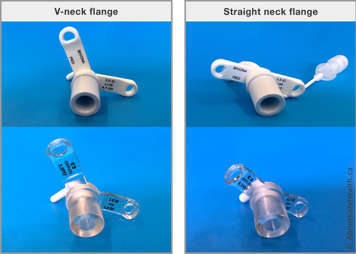
Flanges can also have either a clear or opaque material. A clear flange allows for increased visibility of the skin. The newer models of tracheostomies offer clear flanges.
Obturator
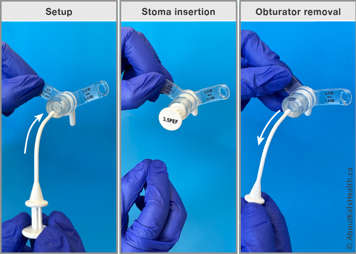
The obturator helps to guide and support the tracheostomy tube into the stoma when it is being replaced during a tube change. The obturator is a rigid, removable part of a two-part tracheostomy tube and is used only when inserting the tube. The obturator is removed immediately once the tube is in place, allowing the child to breathe.
Three-part tracheostomy tube
Older children have tracheostomy tubes that look similar, except they may have three parts.
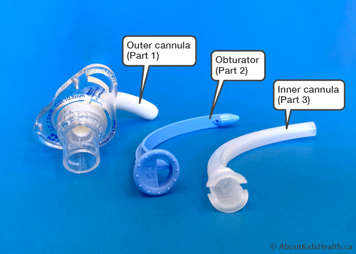
A three-part tracheostomy consists of:
- outer cannula with a neck plate (flange)
- obturator
- inner cannula
Inner cannula
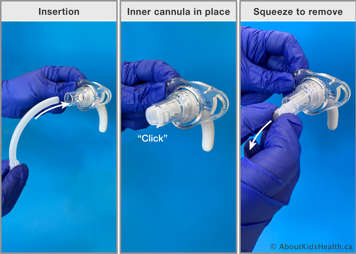
The inner cannula is a removable piece that fits inside the outer cannula tracheostomy tube and acts as a liner. The liner can be removed and cleaned to prevent build-up of secretions inside the tracheostomy tube. Inner cannulas can be disposable or reusable. Reusable inner cannulas are used more often in the community. The inner cannula locks into place to prevent accidental removal.
NOTE: Not all tubes have an inner cannula.
- The Bivona silicone tubes do not have inner cannulas. They have a SuperSlick coating that keeps mucus from sticking to it. When cleaning these tubes, refer to the manufacturer’s instructions, and do not scrub them too hard or the coating may come off. Inspect the tube before use.
- Bivona tubes also have a metal wire inside the tube that reinforces the shaft so that it doesn’t kink or bend. Since this tube contains metal, let your health-care team know about this if your child is going to have surgery or an MRI (magnetic resonance imaging) scan.
- Paediatric and infant tracheostomy tubes also do not have an inner cannula. This is because the diameter of the tube is small and adding an inner cannula will make it smaller and more difficult to breathe through the tube.
NOTE: Bivona tracheostomy tubes do not have an inner cannula.
Tracheostomy ties
Both two-part and three-part tracheostomy tubes are held in place with ties that wrap around the neck. These ties can be made of cotton, foam or nylon padding or, most commonly, Velcro. They attach to either side of the neck plate and go around the neck. Some ties also offer a moisture wick lining to keep skin dry and reduce breakdown.
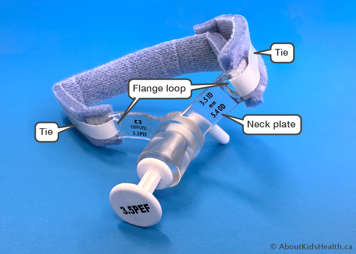
It is recommended to change the ties at least once a day or when they are wet or dirty. Ties should be checked for fit between the neck and the ties. Ensure the Velcro sticks well.
It is easiest and safer if ties are changed by two caregivers:
- One person will hold the trach in place.
- One person inspects and cleans the skin and changes the ties.
Trach ties are secure when:
- There is 1 finger space between your child’s neck and the trach ties if they are a baby or small child.
- There are 2 finger spaces between your child’s neck and the trach ties if they are an adolescent or adult.
Twill ties
Twill ties are made of fabric material. Twill ties are no longer recommended but are still included in the tracheostomy tube box when you purchase them. Twill ties cannot be easily adjusted like Velcro ties and once they become soiled or stretched, they must be replaced. Twill ties can become uncomfortable and often lead to skin issues as they tend to put more pressure on the skin around the neck. Velcro is preferred, especially during emergency tracheostomy tube changes, as they can be taken off much easier. Scissors are still recommended in the emergency tracheostomy kit to help take off Velcro ties faster if you cannot get them off easily with your fingers.
Twill ties are no longer recommended as they cannot be taken off quickly in the event of an emergency.
Metal bead tracheostomy ties
Metal beaded tracheostomy ties are also not recommended. These type of tracheostomy ties are not approved by Health Canada. They may cause aspiration if accidentally broken.
Examples of approved tracheostomy ties for paediatrics
- Dale Tracheostomy Tube Holders (shown in picture above)
- NeoFoam® Tracheostomy Tube Holder by NeoTech
- Posey Foam Trach Collar Ties by Posey
- AirLife Pediatric Tracheostomy Tube Holder by CareFusion
- Tracoe care Neck Strap for Neonates, Infants and Children by Tracoe
Some caregivers use hand-made tracheostomy ties. Ensure ties can be secured well but are removable in the event of an emergency. Watch out for any skin irritation as these products often do not contain moisture wicking materials.
If your child has a tube that is not covered in this manual, please review with your child’s health-care team to find out what type of trach ties you need.
Type and size of tracheostomy tubes
Your child’s ENT surgeon will determine the size of tracheostomy tube appropriate for them. Tracheostomy tubes come in many different sizes including neonatal, paediatric and adult sizes. It is important to know the size of your child’s tracheostomy tube. Your child’s tube may change as they grow, or they may need a different type of tube. Your child will also have a tracheostomy tube that is one size smaller in their emergency tracheostomy kit in case the same size cannot be inserted.
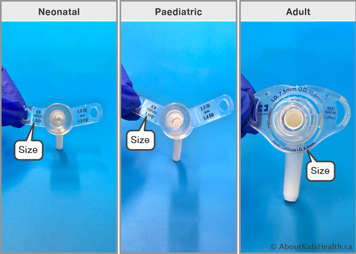
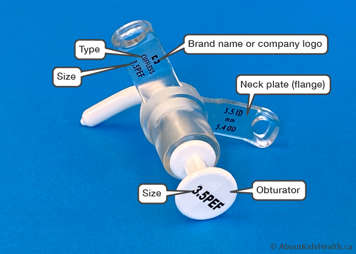
The text on the flange and obturator of tracheostomy tubes identifies the brand, size and type of tube. Read more about this below in the section titled "Identifiers on tracheostomy tubes".
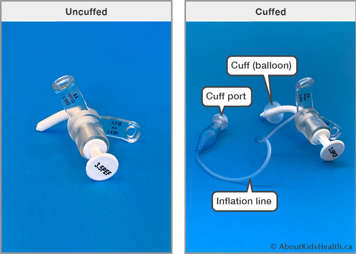
Uncuffed (cuffless) and cuffed tracheostomy tubes
Uncuffed tracheostomy tubes
When a tracheostomy tube is uncuffed, there is no balloon around the end of the tube. Some air may be able to pass up and around the tracheostomy tube, vocal cords, mouth and nose.
Some children can produce sounds around their tracheostomy, but others cannot.
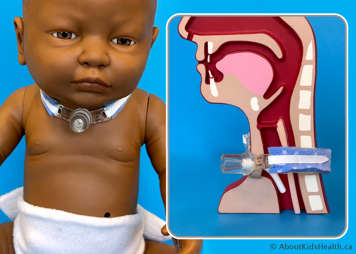
Some children can produce sounds around their tracheostomy, but others cannot.
Cuffed tracheostomy tubes
A cuffed tracheostomy tube has a balloon on the lower end of the shaft of the tube. When the balloon is inflated, it gently seals the airway to prevent air or fluid from passing around the cuff. This may be needed when your child is on a breathing machine (ventilator) to make sure air does not escape around and up through the mouth and nose.
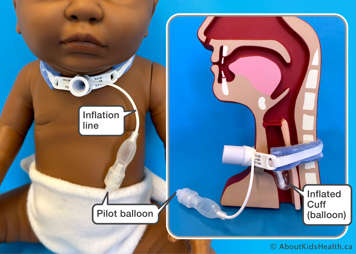
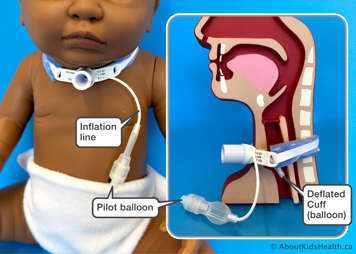
Cuffed tracheostomy tubes can be filled with air or water. Your child's health-care team will provide recommendations on which one to use, if a cuffed tracheostomy tube is needed.
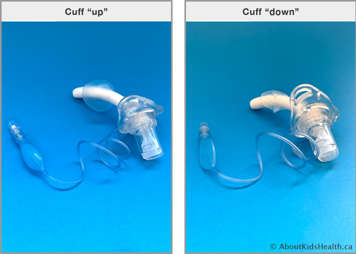
Cuffed tubes will have a pilot/inflation line near the neck flange. This is how you can inflate and deflate the balloon. This consists of a pilot balloon/cuff port and an inflation line. The cuff (balloon) is inflated using a syringe with either air or sterile water. This will depend on the type of tube your child has and the manufacturer’s recommendation. The pilot balloon can also give you a visual cue if the cuff is "up" (the balloon is inflated) or "down" (the balloon is deflated). However, this does not tell you how much air or sterile water is in the cuff. The amount to inflate the cuff will be determined by your health-care team while the child is in the hospital, including when to inflate and deflate it. Cuff checks are a part of daily care.
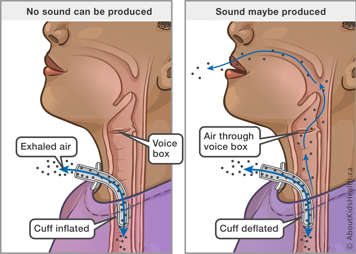
When a tracheostomy cuff is inflated, all the air is directed into the lungs and exhaled completely back out through the tube. Exhaled air will not be directed to your child’s voice box. This means that your child cannot vocalize when the balloon is inflated. If the cuff is not inflated, air can pass around the outside of the tracheostomy tube and up through the voice box, allowing the child to be able to vocalize. The amount of air going around the tube to the upper airway depends on the size of the tracheostomy tube in relation to the child’s trachea.
A luer lock syringe is used to fill the balloon.
Shiley and Bivona tracheostomy tube blue cuff ports can only be filled with air. Never fill these cuffs with water because they are not meant for water. The water can leak into your child’s lungs.
The Bivona clear cuff ports can only be filled with sterile water. Never fill these cuffs with air as the air will diffuse out and the cuff will not remain inflated.
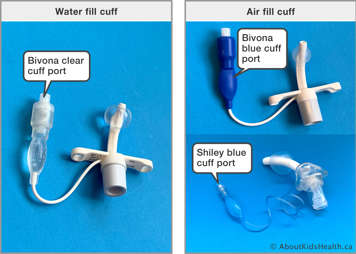
NOTE: Ensure the inflation line is not stretched. If the inflation line is damaged or worn out or if the balloon does not fill, discard and replace with a new tracheostomy tube.
How to check a tracheostomy tube cuff prior to use
If your child uses a tracheostomy tube not described on this page, your health-care team will provide you with clear instructions about:
- when to inflate and deflate the cuff, if the tube has one
- whether to use sterlie water or air to inflate the cuff
- how many millilitres of sterile water or air to use when inflating the cuff
It is important to not substitute one cuffed tube for another. Always follow the manufacturer's instructions to make sure you are filling the tracheostomy tube cuff with the correct substance (sterile water versus air).
To check the amount of sterile water in the cuff
- This is a daily check done to check the amount of water or air in your child's cuff, if they have a cuffed tracheostomy tube. This check is done while your child has the cuffed tracheostomy tube in place.
- Deflate the cuff first. Suction you child after cuff is deflated in case there are secretions sitting on top of the cuff that move down into the lungs.
- Cuff deflation and inflation are done while the tracheostomy tube is in your child. The steps below show how the cuff works.
-

Wash your hands or use hand sanitizer and put on clean gloves.
-

Use a Luer-Lok tip syringe. Make sure that the plunger is all the way in (see image).
-

Push and twist the syringe onto the pilot balloon.
-

Pull back the plunger to draw all the sterile water and air into the syringe.
-

Hold the plunger with your thumb and pointer finger to keep the water from going back into the cuff.
-

Hold the pilot balloon and twist off the syringe.
-

Hold the syringe with the Luer-Lok end up. Slowly push the plunger up to remove the air.
-

Hold the syringe at eye level and see how many mL of sterile water is in the syringe. Adjust the amount to your child’s prescription if needed. Push any remaining air out of the syringe so the water is at the tip of the syringe.
- If you need to top up the amount of water in the syringe, pour fresh sterile water into a cup and draw up the desired amount (see below).
To inflate the cuff with sterile water
Wash your hands or use hand sanitizer then put on clean gloves.
Use a Luer-Lok tip syringe.
Pour fresh sterile water into a medicine cup.
Draw up the prescribed amount of sterile water into the syringe. Be sure to remove the air bubbles and check that the water level in the syringe is accurate.
-

Hold the pilot balloon and push and twist the syringe in place.
-

Push the plunger in slowly to inflate the cuff.
-

Hold the end of the plunger to make sure that all the fluid goes to the cuff and does not flow back to the syringe.
-

Hold the pilot balloon and twist the syringe off.
An air cuff is filled the same way except that you would not use any water in syringe to fill the cuff. Here filling a Bivona Aire cuff is shown.
If your child uses a tracheostomy tube not discussed here, your health-care team will provide clear instructions about:
It is important to not substitute one cuffed tube for another. Always follow the manufacturer’s instructions to make sure you are filling the tracheostomy tube cuff with the correct substance (sterile water versus air). |
Identifiers on tracheostomy tubes
Tracheostomy tubes come in different sizes. There are tracheostomy tubes for neonates, paediatrics and adults. The ENT surgeon will decide the most suitable tracheostomy tube for your infant/child. It is important to know the current size of your child’s tracheostomy tube. The tracheostomy tube size will be reassessed as your child grows. A tracheostomy tube one size down in diameter may be used in an emergency or other special situation. This one size down tube will be an important part of the emergency tracheostomy kit.
Your child’s tracheostomy tube will have letters and numbers that identify the tube. The numbers will be the measurement of the inside diameter of the tube and the outside diameter of the tube in millimeters (mm). The inner diameter (ID) is the diameter of the inner tracheostomy tube opening and the outer diameter (OD) is the diameter of the outside of the tube.
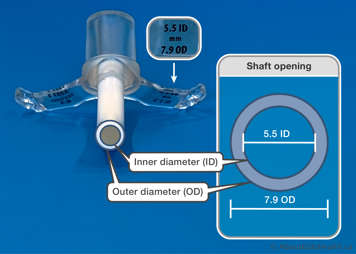
- On the left side of the flange (when you are looking at your child), is typically where the brand of the tube, size, type and any cuff information is located.
- On the right side of the flange, is the inner diameter (ID) of the tube, the outer diameter (OD) and in some brands of tubes, the length of tube. These measurements are usually in millimeters (mm).
- Not all brands have all the information on the flange such as company name or type of tube (cuffed vs cuffless).
- Not all brands have cuff information labelled on the flange (e.g., Bivona). Look for the cuff inflation line to identify that it is a tracheostomy tube with a cuff. The box that the tracheostomy comes in will also have this information.
Most companies will list the size, type, and brand of tube on the box which should match the information on the tracheostomy flange. Some tracheostomy brands or sizes may not have the information written on the flange. In this case, keep the box for the information.
Important: Do not reuse a tracheostomy tube past the recommended time frame. In addition, discard the tube if the information on the flange and/or obturator is rubbed off and you cannot confirm type and sizing. Tubes that are cracked or discolored should also be discarded. |
Shiley tracheostomy tube: New and old model comparisons
You may find vendors still selling the older model of Shiley tracheostomy tubes. Below is a chart that describes the differences between the new and old naming.
- The letters (NEO, NEF, PED or PEF) indicate if it is a neonatal (NEO, NEF) or paediatric (PED or PEF) tube. Paediatric tracheostomy tubes are longer than neonatal tubes.
- The new version of the Shiley tubes end with the letter "f" for flexible as the material has been improved to be softer. The flange is now also clear versus opaque.
- Your child may have another type of tracheostomy tube prescribed. See chart below:
| New Shiley tracheostomy tube types | Description |
|---|---|
| PEF (new name of the Shiley tracheostomy tube) (PED - old name) | Paediatric cuffless tube |
| PELF | Extra-long paediatric cuffless tube |
| PCF | Paediatric tube with cuff |
| PLCF | Long paediatric tube with cuff |
| NEF (new version of the tracheostomy tube) (NEO – old name) | Neonatal cuffless tube |
| NCF | Neonatal tube with cuff |
Adult sized tracheostomy tube
An older child/teen may require a larger adult sized tracheostomy tube. The sizing for the adult tubes is different than in neonatal or paediatric tubes. The inner and outer diameter as well as the length of tube is different than the naming of the tracheostomy tube. For example, below is a Shiley adult sized tracheostomy tube. The name of the tube is a 4CN65H.
The Bivona adult tracheostomy tube
The Bivona adult sized tracheostomy tube naming is different than the Shiley brand. The inner diameter (ID) is the reference for the tracheostomy size, just like with the paediatric and neonatal sizing. Also, the length for the adult sizes is significantly longer than the neonatal or paediatric sizes.
Information located on the tracheostomy tube box
Most companies will list the size, type, and brand of tube on the box which should match the information on the tracheostomy flange. Some tracheostomy brands or sizes may not have the information written on the flange. In this case, keep the box for the information.
This is what comes in the box: Tracheostomy tube with obturator and booklet. Please note, the box also comes with twill ties but these are no longer recommended to use. Please see section on tracheostomy ties (above).
Speciality tubes
Your child may be prescribed a tracheostomy tube that has additional features such as a flexible extension from the flange that keeps connections away from the neck (e.g., Bivona FlexTend) or an adjustable flange (e.g., Bivona Adjustable Neck Flange Hyperflex Tracheostomy Tube).
Metal, stainless steel or silver tracheostomy tubes
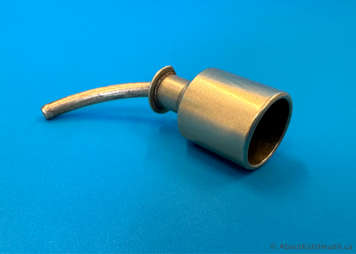
Metal, stainless steel and silver tracheostomy tubes are not used very often anymore, but some children need them for specific reasons. The ENT surgeon will decide what type of tube your child needs.
Some advantages of a metal tracheostomy tube include:
- cost (metal tracheostomy tubes can be sterilized then reused)
- less infection risk (the surface of a metal tracheostomy tube is less porous than a plastic tracheostomy tube and less likely to grow bacteria)
- thin wall (the wall of the tube is thinner compared to the plastic tracheostomy tubes, allowing for greater airflow through the airway)
- less allergic reaction (if your child had a persistent reaction to previous silicone or plastic tracheostomy tubes, the ENT surgeon may try a metal tracheostomy tube)