At the end of this chapter, you will be able to:
- recognize when to perform an emergency tracheostomy tube change
- discuss when to provide rescue breathing
Trauma to stoma
A small amount of bleeding may be caused by suctioning or if the tracheostomy is rubbing against the stoma or irritating the inside of the airway. If you think this has happened, review the following:
- Make sure you are not suctioning past the end of the tracheostomy tube. Measure suction catheter length and write down the correct tube suctioning depth.
- Ensure the ties are not too tight.
- Ensure that the correct size tracheostomy tube is in the stoma.
- Assess each tracheostomy before changing, ensuring good integrity of plastic or silicone and proper angle. Throw out any tracheostomies with questionable integrity. When in doubt, start with a new one.
- Do not force a catheter that is too tight into the tracheostomy tube. Get a smaller size if needed.
- Coughing for a long time may cause irritation.
- Ensure the child is receiving humidification through the tracheostomy tube.
Your child’s ear nose and throat (ENT) doctor may wish to look down the tracheostomy with a camera. Granulation tissue is the new tissue that forms when a wound is healing, and it’s also the extra tissue that can form around the tube. If granulation tissue is present, they may prescribe medication to be dropped or nebulized into the tracheostomy.
A large amount of blood, especially bright red and squirting out of the tracheostomy tube or around the stoma is NOT normal. THIS IS AN EMERGENCY. Do NOT remove the tracheostomy as it could be the only way to keep the airway open.
- Call 911.
- Keep the tracheostomy from filling with blood by suctioning only to the proper tube suction depth.
- If the child is not breathing or only gasping and becomes unresponsive, lay them on a hard, flat surface and perform CPR: 30 compressions and 2 breaths through the tracheostomy until child wakes up or help arrives.
Mucous plug

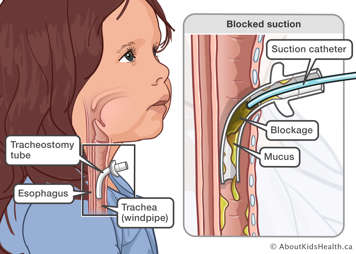
Suctioning your child's airway helps to clear secretions so that they can breathe more easily. When your child has a tracheostomy tube, it is important to suction it regularly so that it does not become blocked. Mucous can become thick and form a plug, causing a blockage. This can be because there is not enough humidity through the tracheostomy tube, or they are not getting enough water in their diet. Some signs or symptoms that the tracheostomy tube is blocked include the following:
- the child is having trouble breathing
- the suction catheter will not pass through the tracheostomy tube
- you do not feel or hear air coming through the tracheostomy tube
- there is an obvious mucous plug (e.g., you can see it)
- new noises from the tube (e.g., whistling, grunting, or no noise if it is fully blocked)
- new noises from child’s upper airway (for example, more vocalization)
- lower oxygen saturation
- coughing
- the child is irritable or looks anxious/scared
If you suspect a mucous plug do the following:
If the tracheostomy tube does not have an inner cannula, suction the tracheostomy tube.
If you are unable to remove the mucous plug and/or have difficulty passing the correct size suction catheter into the tracheostomy tube, change the tracheostomy tube:
- Remove your child’s tracheostomy tube.
- Take out the new same size tracheostomy tube from emergency tracheostomy kit. The backup tracheostomy tube should already be prepared with the obturator inserted and ties on. If not, then insert the obturator.
- Position the child appropriately.
- Deflate the cuff if applicable.
- Insert the new tracheostomy tube, remove obturator, secure with new ties and inflate the cuff if applicable.
If the tracheostomy has an inner cannula, suction the inner cannula.
- If you are unable to remove the mucous plug and/or have difficulty passing the suction catheter into the trach, change the inner cannula as taught in the hospital.
- If you are unable to insert the clean inner cannula and/or breathing difficulties continue, change the tracheostomy tube following the directions above.
Accidental decannulation

Accidental decannulation is when the tracheostomy tube comes out of the stoma unplanned. This can happen for several reasons:
- the child pulled on the tracheostomy tube
- the child may have pulled on an adjunct connected to the tracheostomy tube (HME, ventilator tubing, etc.)
- the tubing attached to the tracheostomy tube gets caught on something and pulled
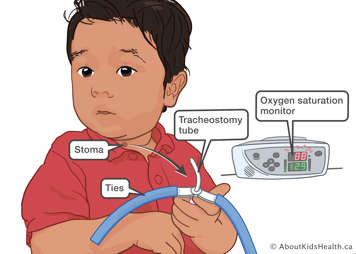
- the tracheostomy ties are loose causing the tracheostomy tube to fall out
- if the child has outgrown the length of their tracheostomy tube and for example, they turn their head or change position. This is assessed at routine ENT follow-up appointments using a bronchoscope (camera) that is placed in the tracheostomy tube. Contact your medical team if the tube is falling out easily without obvious puling on the tracheostomy tube or other attached tubing.
Signs of accidental decannulation
- You can see that that the tube is coming out or has come out fully.
- Your child shows signs of increased work of breathing or distress.
- Your child complains of difficulty breathing or becomes anxious or looks scared.
- Your child makes sounds they normally would not, or their voice is louder.
- You do not feel air coming out of the tracheostomy tube.
Preventing accidental decannulation
- Ensure your child is supervised at all times.
- Ensure your child does not pull on their tracheostomy tube.
- Ensure ties are secure and checked often.
- Ensure Velcro on tracheostomy ties are in good condition and sticking properly.
- Ensure any tubes connected to your child’s tracheostomy are not tangled or dangling where they could be pulled on.
- Ensure you can visualize your child’s tracheostomy tube at all times. Do not cover your child’s tracheostomy tube with anything such as a handkerchief.
If your child’s tracheostomy tube accidentally comes out
- Remove the old tracheostomy tube by undoing or cutting ties, whichever is faster. Deflate the cuff if applicable.
- Take out a new same size tracheostomy tube from the emergency tracheostomy kit. The tracheostomy tube should already be prepared with the obturator and ties on. If not, then insert the obturator.
- Position child appropriately.
- Insert the new tracheostomy tube, remove the obturator, secure with new ties and inflate the cuff if applicable.
If you are unable to insert a new tracheostomy: Reposition your child’s shoulder roll, check that you have the correct tube size and obturator inserted in the tube. Have a second caregiver (if available) attempt to insert the same size tube while you prepare the smaller size tube. If successful, the child should still see a health-care provider as soon as possible.
If you are unable to insert airway and child is in respiratory distress, call 911 and:
- Ventilate the child using the mouth-to-mouth technique* to support breathing.
- You may need to place gauze or a finger over the stoma if lots of air leaking. If there is a second person, let them do this part so you can focus on providing proper ventilation.
*If the child has no anatomical connection between upper and lower airway (i.e., critical airway), give breaths mouth-to-stoma or mouth to stoma mask or manual resuscitation bag with stoma mask.
Respiratory distress
If the child appears to be in respiratory distress, follow the emergency troubleshooting steps below.
If at any point your child is struggling to breathe, not breathing or suddenly stops breathing, call 911.
- Do a quick check of the tracheostomy tube.
- Ensure the tracheostomy tube is in place.
- Try to suction the tracheostomy tube.
- If tracheostomy tube appears patent (unblocked) with suctioning, provide supporting breaths via manual resuscitation bag if the child is in respiratory distress.
- Continue to assess.
- Apply oxygen if available.
- Are there signs of infection (fever, lethargy, change in mucous amount/colour)?
- Call health-care provider or take child to emergency room.
- If you are unable to pass the catheter to the premeasured depth, the tube is blocked. Proceed to Step 3.
- If your child has a tube with an inner cannula, remove the blocked inner cannula and replace with a clean one.
- Perform an emergency tracheostomy tube change.
- If there is a second caregiver present, have them assist with the tube change, if not, proceed on your own.
- Remove child’s tracheostomy tube. Deflate the cuff if applicable.
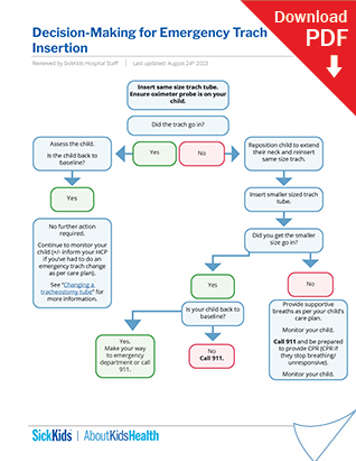
- Obtain the child’s emergency tracheostomy kit. Use the spare same size tracheostomy tube to perform the change. Position the child and insert the new tracheostomy tube. Secure ties.
- If you are able to insert the tracheostomy tube, suction and provide breaths via manual resuscitation bag, if needed. Continue to assess.
- Reinflate the cuff, if there is one.
- Apply oxygen, if available.
- If you are unable to insert spare same size tracheostomy tube, reposition your child’s shoulder roll and check that you have the correct tube size and obturator inserted in the tube. Have a second caregiver (if available) attempt to insert the same size tube while you prepare the smaller size tube.
- If you are able to insert the one size smaller tracheostomy tube, suction and provide supportive breaths via manual resuscitation bag if needed. Continue to assess.
- Apply oxygen if available.
- The child must be brought to hospital if you are only able to insert the one size smaller tracheostomy tube for assessment and upsizing.
- Reinflate the cuff.
- Reinsert the inner cannula after the trach change.
- If unable to re-insert the same size tracheostomy tube.
- If unable to insert the one size smaller tracheostomy tube and child is not breathing effectively, begin providing breaths by mouth to mouth while blocking the stoma.
- For health-care professionals in the home, manual ventilation can be provided mask to stoma or mask to mouth.
- If your health-care team has told you your child has a critical upper airway, provide breaths by mouth or mask to stoma as taught.
- Call 911.
- Ensure someone has called 911.
- Call 911 at any point in these steps if you need help.
- Ensure you notify 911/EMS (Emergency Medical Services) that the child has a tracheostomy tube.
- Unlock your front door for 911/EMS.
- Start CPR.
- Begin CPR if a child becomes unresponsive, stops breathing and/or is only gasping.
- If the child becomes unresponsive and you are alone and do not have a phone nearby, do 5 sets of compressions and breaths (30 compressions, 2 breaths) before going to call 911.

Download this aid for decision-making for emergency trach tube insertion and for increased work of breathing.