By the end of this chapter, you will be able to:
- perform the tests to ensure your resuscitaion bag is not leaking
- demonstrate how to clean a reusable resuscitation bag
How do I care for a manual resuscitation bag?
The manual resuscitation bag will only work well if it does not have any leaks. If there is a tear in your manual resuscitation bag, air will leak out and there may not be enough left to fill your child's lungs.
Every day, you must do three simple tests to make sure there are no leaks in your manual resuscitation bag.
When testing the manual resuscitation bag, the pop-off valve should be in the OFF (up) position.
Daily test 1: General bag function
-

Squeeze the bag a few times to ensure it fully squeezes and fully reinflates.
Daily test 2: Leak test
- Wash your hands.
- Perform the test with the pop-off valve in the OFF position (when the pop-off valve is covered by the locking clip). The bag should be firm and pressurize without leaking out of the valve.
-

Cover the outlet of the bag with the palm of your hand.
- With your other hand, squeeze the bag. You should feel the pressure in the bag against your hand.
- If you hear or feel a leak of air, tighten all the connections.
- After checking all the connections, test for leaks again by repeating step 2. If there are no leaks, continue to the next step.
- If there is a leak when you place the pop-off valve in the OFF position and the bag does not pressurize, replace your manual resuscitation bag by contacting your respiratory vendor for a replacement.
- Put the locking clip back down so that the valve is in the ON position and the excess pressure pop-off is active.
Daily test 3: Function test (testing air inlet flaps)
- Wash your hands.
- Squeeze the bag to empty it.
- Cover the outlet of the bag with the palm of your hand.
- Release the bag while keeping the outlet covered with your hand.
- The bag should fill up freely.
-

If the bag does not fill up freely, the inlet valve may be sticking.
- Unscrew the inlet valve assembly and gently loosen the valve. Then put the valve back together. If you have a disposable bag, ensure the inlet valve is not wet or sticky. It is time to replace the bag if this test does not pass. Do not try to disassemble the disposable bag in any way.
Repeat steps 1 to 4 to make sure the manual resuscitation bag fills freely. If there is still a problem, you must replace your manual resuscitation bag. Contact your respiratory vendor.

If your child has a PEEP valve, this should also be checked when checking the bag to ensure it is set properly.
Resuscitation bag sizes

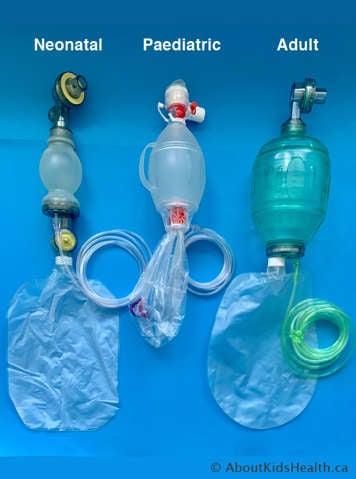
The Laerdal Silicone Resuscitator Bag is the most commonly used resuscitation bag. It comes in the following sizes:
- adult size for patients over 20 kgs
- paediatric (child) size for patients between 2.5 and 20 kgs
- preterm size for patients that weigh less than 2.5 kgs
The paediatric and preterm bags also include a pop-off valve to prevent high airway pressures and keep lungs from over-inflating.
When higher pressure is necessary, the pressure relief valve can be closed by pushing down the valve stem or using the locking clip.
How do I clean the manual resuscitation bag?
To watch a video showing how to clean the manual resuscitation bag, click here.
Reusable manual resuscitation bag
Wash the resuscitation bag and all its parts at least once a week if it is used. You may need to wash it more often if it is dirty or if you have used it a lot during an illness.
- Gather your equipment and supplies:
- manual resuscitation bag
- adaptor for the tracheostomy tube
- flex hose or tube
- dish soap
- white vinegar
- pail #1: warm, soapy water
- pail #2: solution with 1 part vinegar and 3 parts water
- Take the bag apart as per the manufacturer’s instructions or how you were taught.
- Put all the parts into pail #1. Make sure all the pieces are covered and let them soak for 20 minutes.
- Pour the water out of pail #1. Rinse the parts well with tap water.
- Put all the parts into pail #2. Make sure all the pieces are covered and let them soak for 20 minutes.
- Pour the water out of pail #2.
- Rinse the parts well with tap water.
- Place the parts on a clean towel and allow them to dry.
- Reassemble the parts of the manual resuscitation bag.
- Perform the 3 daily tests (see above) before you store the bag.
The oxygen tubing cannot be soaked for cleaning. You can wipe down the outside of the tubing but if it is visibly soiled or has a crack/tear, then it will need to be replaced. The PEEP valve cannot be immersed in water also.
Disposable manual resuscitation bag
If you are using a disposable manual resuscitation bag, it cannot be taken apart for cleaning. Simply replace it when it gets soiled on the inside or if any of the checks do not pass. Most manufacturers recommend replacing the bag monthly.